HTTPS
Topics in this section,
Topics in this section,
Configure HTTPS Proxy server details on client using certificates
Configure HTTPS Proxy server details on client using firefox
Configure custom webserver details on both sides(server and client side) using certificates
Decrypting HTTPS traffic in wireshark between proxyserver to webserver and webserver to proxyserver
Decrypting HTTPS traffic in wireshark between client to proxyserver and proxyserver to client
In this section, you are going to learn
Terminology
Version Info
High Level Protocol Setup
Experimental Setup
Application
Libraries
Step-1 : Find the IP address of Ubuntu machine
test:~$ ifconfig

docker0: flags=4099<UP,BROADCAST,MULTICAST>  mtu 1500
inet 172.17.0.1  netmask 255.255.0.0  broadcast 172.17.255.255
ether 02:42:c2:a4:22:08  txqueuelen 0  (Ethernet)
RX packets 0  bytes 0 (0.0 B)
RX errors 0  dropped 0  overruns 0  frame 0
TX packets 0  bytes 0 (0.0 B)
TX errors 0  dropped 0 overruns 0  carrier 0  collisions 0

enp0s31f6: flags=4163<UP,BROADCAST,RUNNING,MULTICAST>  mtu 1500
inet 10.91.239.121  netmask 255.255.255.0  broadcast 10.91.239.13
inet6 fe80::bb87:2721:82b8:f6cd  prefixlen 64  scopeid 0x20<link>
ether e4:54:e8:4e:e4:b9  txqueuelen 1000  (Ethernet)
RX packets 10426884  bytes 7818062595 (7.8 GB)
RX errors 0  dropped 0  overruns 0  frame 0
TX packets 3605750  bytes 434038103 (434.0 MB)
TX errors 0  dropped 0 overruns 0  carrier 0  collisions 0
device interrupt 16  memory 0xdf000000-df020000

lo: flags=73<UP,LOOPBACK,RUNNING>  mtu 65536
inet 127.0.0.1  netmask 255.0.0.0
inet6 ::1  prefixlen 128  scopeid 0x10<host>
loop  txqueuelen 1000  (Local Loopback)
RX packets 1097677  bytes 88297298 (88.2 MB)
RX errors 0  dropped 0  overruns 0  frame 0
TX packets 1097677  bytes 88297298 (88.2 MB)
TX errors 0  dropped 0 overruns 0  carrier 0  collisions 0
Note
To find the IP address of your Ubuntu machine,use the ifconfig command.
From the output of ifconfig command,for example, 10.91.239.121 is used as the Proxy Server IP.
This Proxy server IP is used when connecting HTTPS server to a client.
Step-2 : Install Squid Proxy Server on Ubuntu
test:~$ pwd
/home/test

test:~$ sudo apt update

test:~$ sudo apt install squid
Step-3 : Verify the Installation
test:~$ squid -vStep-4 : Before edit the configuration file
1.Generate SSL certificate because SSL bumping requires the Proxy to decrypt SSL traffic, you need a self-signed SSL Certificate.
test:~$ sudo mkdir -p /etc/squid/ssl_cert

test:~$ sudo openssl req -new -newkey rsa:2048 -days 365 -nodes -x509 -keyout /etc/squid/ssl_cert/squid.key -out /etc/squid/ssl_cert/squid.crt
Note
You will be prompted to enter some information or You can leave it as the default or provide your information.
You can give Common name section give your server IP address.
2.set proper permissions for the SSL key and certificate.
test:~$ sudo chmod 400 /etc/squid/ssl_cert/squid.key

test:~$ sudo chmod 444 /etc/squid/ssl_cert/squid.crt
Step-5 : Edit the Squid Configuration file
test:~$ sudo nano /etc/squid/squid.conf

#specify the port for squid to listen

https_port 3129 tls-cert=/etc/squid/ssl_cert/squid.crt tls-key=/etc/squid/ssl_cert/squid.key

#Define an ACL for the client (replace with your client's IP)

acl client_ip src 192.168.0.10  #this could be the actual IP of the client

#Allow the client IP to access the proxy

http_access allow client_ip

#Define safe ports for HTTP and HTTPS

acl safe_ports port 80           #HTTP_Port (http://)

acl safe_ports port 443          #HTTPS_port(https://)

acl safe_ports port 1025-65535   #allow higher ports.

#Allow access to safe ports (HTTP,HTTPS,etc)

http_access allow safe_ports

#Deny all other clients from accessing the proxy

http_access deny all

#SSL BUMPING RULES

ssl_bump bump all
ssl_bump splice all
ssl_bump terminate all

#Logging and cache settings (optional)

access_log /var/log/squid/access.log
cache_dir ufs /var/spool/squid 100 16 256  #default cache directory with 100MB space
visible_hostname sysadmin     //optional

#Persistent Connection Handling

client_persistent_connections off
server_persistent_connections off
Note
comment all the lines in file the above prompt only to save.
Step-6 : Start the Squid server
test:~$ sudo systemctl restart squid
test:~$ sudo systemctl enable  squid
test:~$ sudo systemctl status squid
Note
If server is not running,check logs at “sudo journalctl -u squid” or “sudo systemctl status squid” and fix the errors.
Step-7 : Allow connection from port 3129 (https port)
test:~$ sudo ufw allow 3129Step-8 : To check the server is listening on port
test:~$ sudo netstat -tuln | grep 3129
tcp6       0      0 :::3129                :::*                    LISTEN
Step-9 : To view the logs
test:~$ sudo tail -f /var/log/squid/access.log
Step -1 : obtain the proxy’s certificate
test:~$ echo | openssl s_client -showcerts -connect 10.91.239.121:3129
- This will show you the certificate chain the proxy is presenting.copy the certificate from the output
(the blocking starting with —-begin certificate—-and ending with —END CERTIFICATE—).
save it to a file,e.g., proxy_cert.pem.
step-2 : ADD the proxy’s certificate to trusted CA store
1.copy the proxy certificate to /usr/local/share/ca-certificates/
test:~$ sudo mv proxy_cert.pem proxy_cert.crt
test:~$ sudo cp proxy_cert.crt /usr/local/share/ca-certificates/
2.update the certificate store
test:~$ sudo update-ca-certificates
this will add the proxy’s self-signed certificate to the list of trusted certificates.
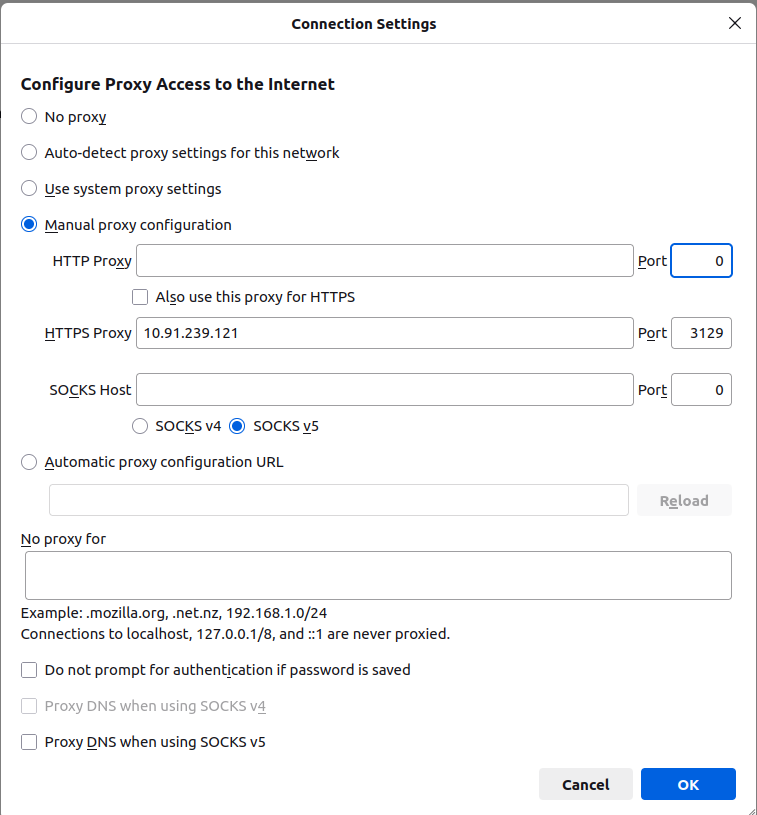
- 1.Open firefox preferences.
Open firefox on your machine.
In the top-right corner,click on the three horizontal lines(the hamburger menu).
Click on settings.
- 2.Access Proxy settings
Scroll down to the Network Settings Section.
Click the settings button next to Network Settings.
- 3.Configure the Proxy
A new window will appear with various options to configure the Proxy settings.
Select Manual Proxy Configuration.
HTTPS Proxy: Enter the IP address of your proxy server (e.g., 10.91.239.121).
Port: Enter the Port number (e.g., 3129,the default squid port).
Click OK.
Then restart the firefox.
4.Then search on firefox,it loads the webpages in browser.
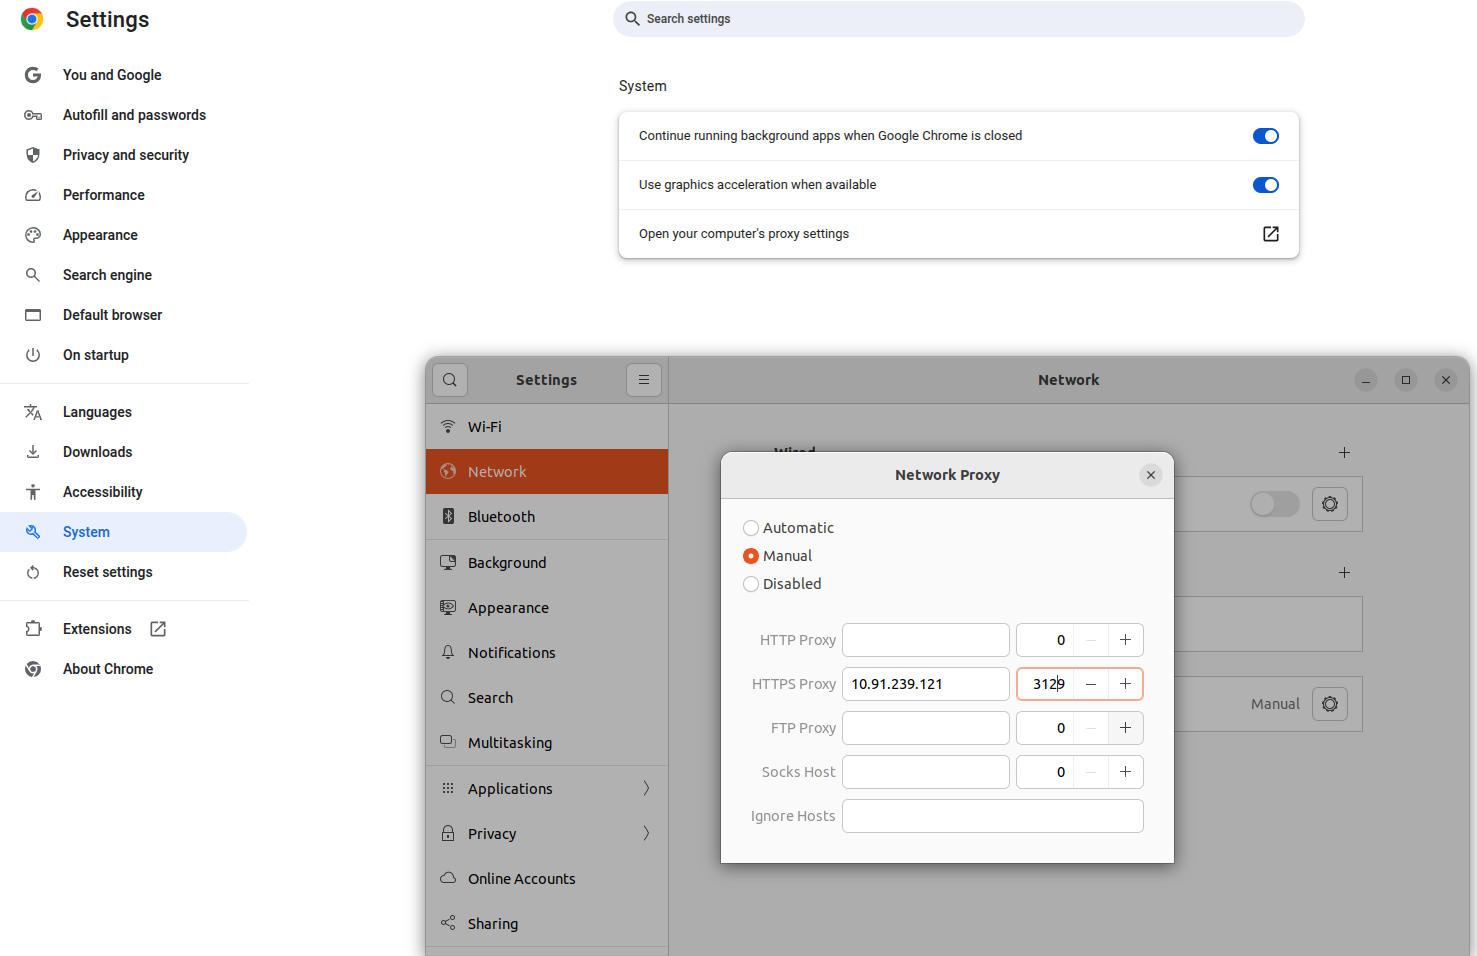
- 1.Open chrome on your machine.
In the top-right corner,click on the three dots.
click on settings.
2.Scroll down to the system in that click on open your computer proxy settings.
3.In that proxy tab to click the NetworkProxy ON and below the configuration select manual option.
4.And enter Proxy server’s IP address and port number in the HTTPS Proxy.
5.After that open the chrome and search https://google.com.
6.If the Proxy is setup correctly,it loads the webpages.
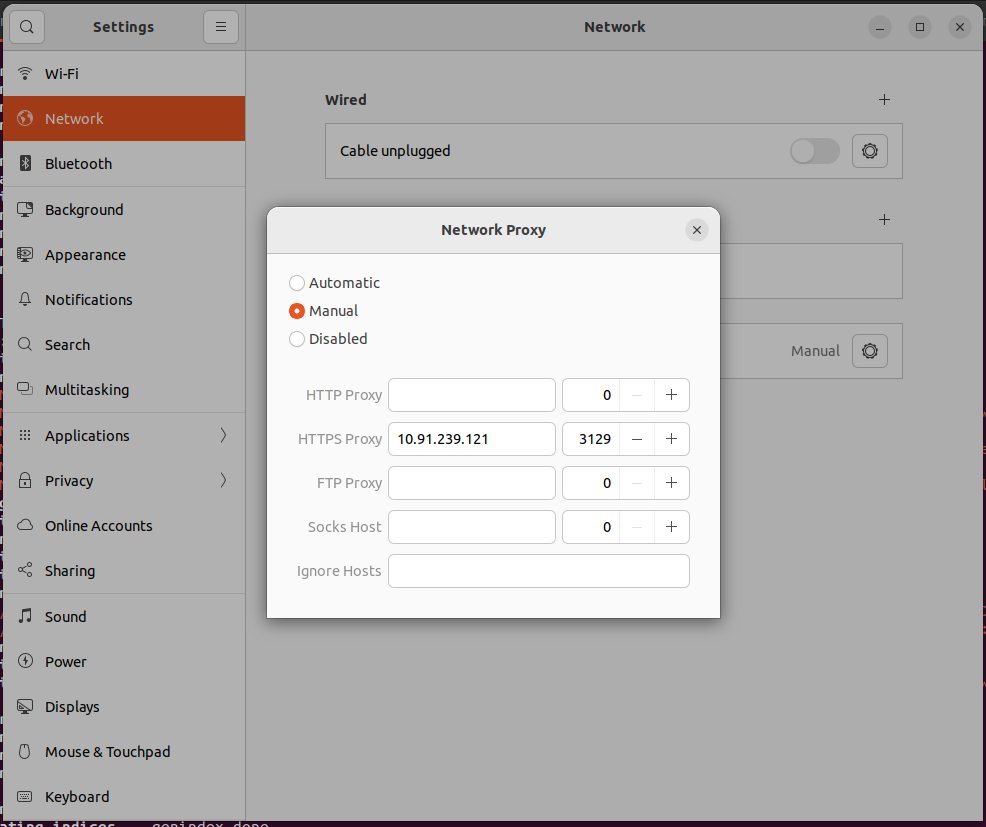
1.Click on the top-right corner of the screen.
2.Click on the settings in that select Network Proxy and click the option Manual.
3.And enter Proxy server’s IP address and port number in the HTTPS Proxy.
4.If the proxy is setup correctly,check on firefox or chrome and serach like https://google.com.
Step-1 : Using Telnet
test:~$ telnet 10.91.239.121 3129
Trying 10.91.239.121...
Connected to 10.91.239.121.
Escape Character is '^]'.
If the connection fails,the output will be something like connection refused or unable to connect.
Note
10.91.239.121 is the Proxy Server IP address referenced in the “Setup HTTPS Proxy Server on Ubuntu” section above.
Step-2 : Using netcat
test:~$ nc -zv 10.91.239.121 3129
Connection to 10.91.239.121 3129 port [tcp/* ] succeeded!
Note
10.91.239.121 is the Proxy Server IP address referenced in the “Setup HTTPS Proxy Server on Ubuntu” section above.
Step-3 : Using ping
test:~$ ping 10.91.239.121
PING 10.91.239.13 (10.91.239.121 56(84) bytes of data.
64 bytes from 10.91.239.121: icmp_seq=1 ttl=64 time=0.092 ms
64 bytes from 10.91.239.121: icmp_seq=2 ttl=64 time=0.036 ms
64 bytes from 10.91.239.121: icmp_seq=3 ttl=64 time=0.094 ms
64 bytes from 10.91.239.121: icmp_seq=4 ttl=64 time=0.105 ms
64 bytes from 10.91.239.121: icmp_seq=5 ttl=64 time=0.094 ms
Note
10.91.239.121 is the Proxy Server IP address referenced in the “Setup HTTPS Proxy Server on Ubuntu” section above.
test:~$ curl --proxy https://10.91.239.121:3129 --proxy-cacert /path/to/proxy_cert.pem https://www.google.com
Expected output:The HTML source code of the webpage hosted at http://www.google.com
Note
10.91.239.121 is the Proxy Server IP address referenced in the “Setup HTTPS Proxy Server on Ubuntu” section above.
Step-1 : wireshark captures
client side
server side
Step-2 :Analysis of Client side Wireshark Capture
- 1.TCP Three-Way Handshake Connection - SYN,SYN-ACK,ACK
Packet 13:SYN - client(192.168.0.10) -> proxyserver(10.91.239.121)
Packet 14:SYN-ACK - client(192.168.0.10) <- proxyserver(10.91.239.121)
Packet 15:ACK - client(192.168.0.10) -> proxyserver(10.91.239.121)

- 2.TCP and TLS Data Exchange Between Proxy(10.91.239.121) and Client(192.168.0.10)
Packet 16: Client Hello - The client (192.168.0.10) initiates the TLS handshake with a ClientHello message, offering cryptographic settings like supported ciphers, TLS version, and session data.
Packet 17: ACK - The server (10.91.239.121) acknowledges receipt of the ClientHello packet from the client.
Packet 18: Server Hello, Change Cipher Spec - The server responds with a ServerHello, agreeing on cryptographic parameters, followed by a Change Cipher Spec message to signal the start of encrypted communication
Packet 19: ACK - The client acknowledges the server’s ServerHello and Change Cipher Spec messages.
Packet 20: Application Data - The server sends application data (likely encrypted application data as part of the TLS handshake process).
Packet 21: ACK - The client acknowledges receipt of application data from the server.
Packet 22: Change Cipher Spec, Application Data - The client sends a Change Cipher Spec message to indicate it is switching to encrypted communication, followed by encrypted application data.
Packet 23: Application Data - The client sends more encrypted application data to the server.
Packet 24: ACK - The server acknowledges the receipt of the client’s application data.
Packet 25: ACK - Another ACK packet from the server, confirming receipt of additional data from the client.
Packet 26: Application Data - The server sends more application data to the client.
Packet 27: ACK - The client acknowledges receipt of application data from the server.
Packet 28: Application Data - The client sends encrypted application data to the server.
Packet 29: ACK - The server acknowledges the application data received from the client.
Packet 30: Application Data - The server sends another batch of application data.
Packet 31: Application Data - The server continues sending application data to the client.
Packet 32: ACK - The client acknowledges receipt of the server’s application data.
Packet 33: ACK - Another acknowledgment from the client, confirming the receipt of more data from the server.
Packet 34: Application Data - The client sends more encrypted application data.
Packet 35: Application Data - The client sends additional application data to the server.
Packet 36: Application Data - The client continues sending encrypted application data.
Packet 37: ACK - The server acknowledges the receipt of the client’s data.
Packet 38: Application Data - The server sends another chunk of encrypted application data.
Packet 39: Application Data - The client sends an acknowledgment of the server’s encrypted application data.
Packet 40: ACK - The server acknowledges the client’s acknowledgment of the encrypted data.
Packet 41: Application Data - The server continues sending application data.
Packet 42: Application Data - The server sends additional encrypted data.
Packet 43: Application Data - The server sends more application data.
Packet 44: Application Data - Another batch of application data from the server to the client.
Packet 45: Application Data - The server sends yet more encrypted data.
Packet 46: ACK - The client acknowledges receipt of the server’s application data.
Packet 47: Application Data - The server sends more application data to the client.
Packet 48: ACK - The client acknowledges receipt of the server’s application data.
Packet 49: ACK - The client acknowledges additional data from the server.
Packet 50: Application Data - The server sends more application data.
Packet 51: Application Data - The server sends further application data.
Packet 52: Application Data - Another chunk of encrypted application data from the server.
Packet 53: Application Data - The server sends more application data.
Packet 54: ACK - The client acknowledges the receipt of the server’s encrypted application data.
Packet 55: Application Data - The client sends another set of application data to the server.
Packet 56: Application Data - The client continues sending encrypted application data.
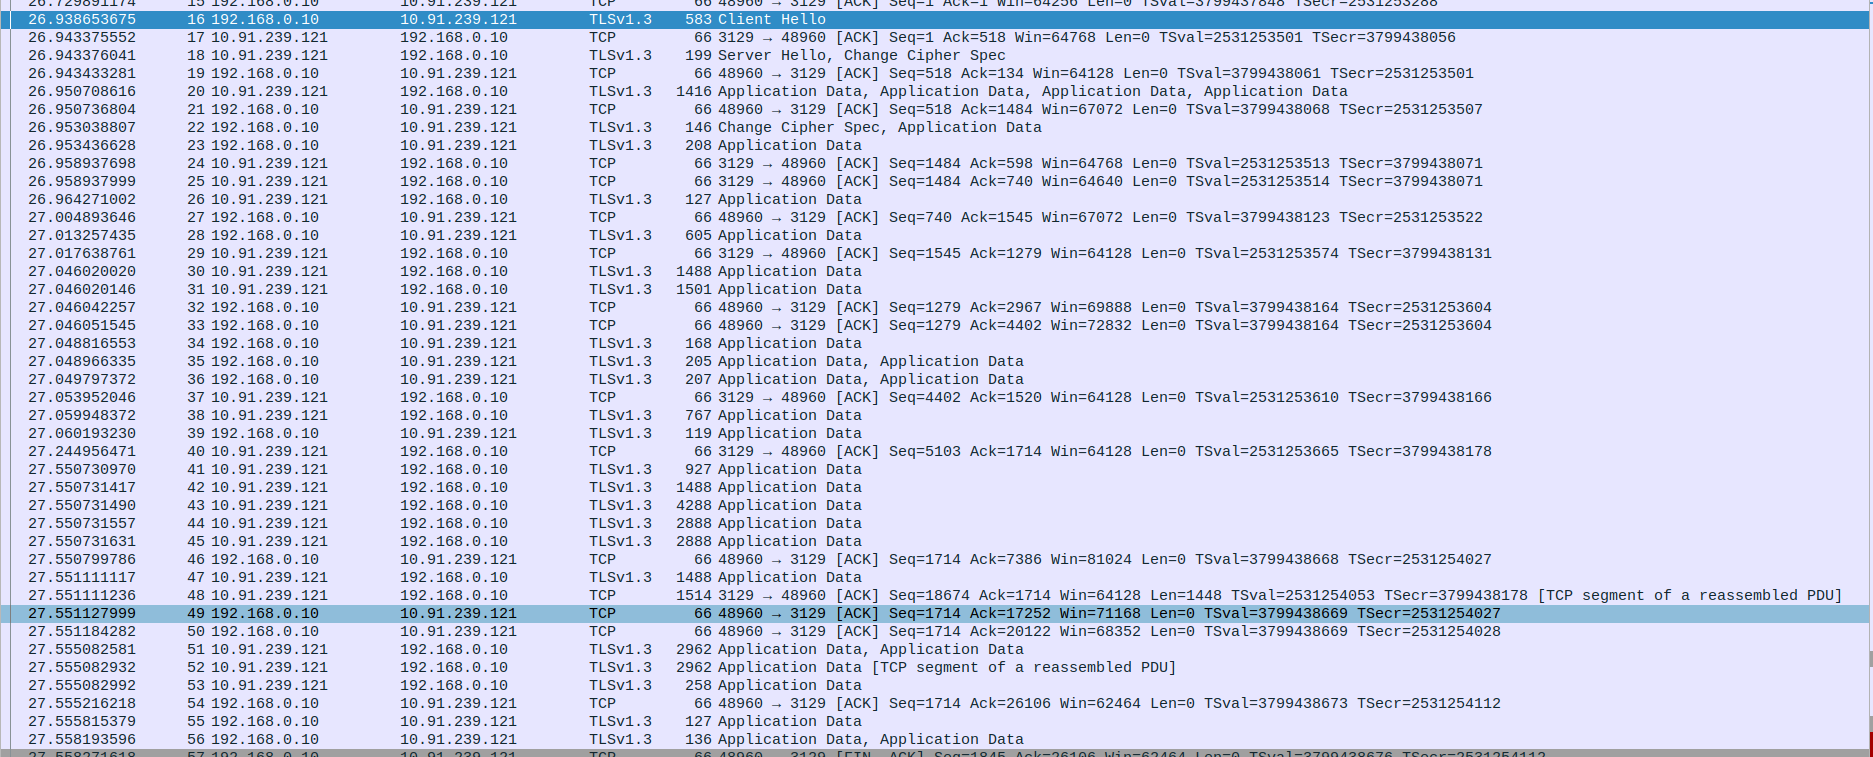
- 3.TCP Connection Termination - FIN-ACK,ACK
Packet 57: FIN-ACK - client (192.168.0.10) → proxy server (10.91.239.121)
Packet 58: ACK - proxy server (10.91.239.121) → client (192.168.0.10)
Packet 59: ACK - proxy server (10.91.239.121) → client (192.168.0.10)
Packet 60: Application Data - proxy server (10.91.239.121) → client (192.168.0.10)
Packet 61: FIN-ACK - proxy server (10.91.239.121) → client (192.168.0.10)
Packet 62: RST - client (192.168.0.10) → proxy server (10.91.239.121)
Packet 63: RST - client (192.168.0.10) → proxy server (10.91.239.121)

Step-3 : Analysis of Server side Wireshark Capture
- 1.TCP Three-Way Handshake Connection - SYN,SYN-ACK,ACK
Packet 11:SYN - client(10.91.239.123) -> proxyserver(10.91.239.121)
Packet 12:SYN-ACK - client(10.91.239.123) <- proxyserver(10.91.239.121)
Packet 13:ACK - client(10.91.239.123) -> proxyserver(10.91.239.121)

- 2.TLS Connection between client and proxy,TCP Connection between Proxy and webserver(Google)
Packet 5: Client sends a TLSv1.3 Client Hello to the proxy to initiate the handshake.
Packet 6: Proxy sends an ACK acknowledging receipt of the Client Hello.
Packet 7: Proxy sends TLSv1.3 Server Hello and Change Cipher Spec to the client.
Packet 8: Client sends an ACK acknowledging the Server Hello and Change Cipher Spec.
Packet 9: Proxy sends TLSv1.3 Application Data (encrypted or handshake-related data).
Packet 10: Client sends an ACK acknowledging the proxy’s application data.
Packet 11: Client sends Change Cipher Spec and Application Data to the proxy.
Packet 12: Proxy sends an ACK acknowledging the Change Cipher Spec and Application Data from the client.
Packet 13: Client sends more TLSv1.3 Application Data to the proxy.
Packet 14: Proxy sends an ACK acknowledging the Application Data from the client.
Packet 15: Proxy initiates a TCP connection to an web server (SYN packet).
Packet 16: web server responds with SYN-ACK to the proxy.
Packet 17: Proxy sends ACK to the web server to complete the TCP handshake.

- 3.TCP and TLS data Communication between Proxy and Client and webserver(Google)
Packet 18: Proxy (10.91.239.121) sends 127 bytes of Application Data to client (10.91.239.123).
Packet 19: Client (10.91.239.123) sends ACK to proxy (10.91.239.121).
Packet 20: Client (10.91.239.123) sends 605 bytes of Application Data to proxy (10.91.239.121).
Packet 21: Proxy (10.91.239.121) sends ACK to client (10.91.239.123).
Packet 22: Proxy (10.91.239.121) sends Client Hello (583 bytes) to server (142.250.196.164).
Packet 23: WebServer (142.250.196.164) sends ACK to proxy (10.91.239.121).
Packet 24: WebServer (142.250.196.164) sends 1466 bytes (Server Hello, Change Cipher Spec) to proxy (10.91.239.121).
Packet 25: Proxy (10.91.239.121) sends ACK to webserver (142.250.196.164).
Packet 26: Proxy (10.91.239.121) sends 1488 bytes of Application Data to client (10.91.239.123).
Packet 27: WebServer (142.250.196.164) sends 1479 bytes of Application Data to proxy (10.91.239.121).
Packet 28: Proxy (10.91.239.121) sends ACK to webserver (142.250.196.164).
Packet 29: Proxy (10.91.239.121) sends 1501 bytes of Application Data to client (10.91.239.123).
Packet 30: Client (10.91.239.123) sends ACK to proxy (10.91.239.121).
Packet 31: Client (10.91.239.123) sends ACK to proxy (10.91.239.121).
Packet 32: Client (10.91.239.123) sends 168 bytes of Application Data to proxy (10.91.239.121).
Packet 33: Client (10.91.239.123) sends 205 bytes of Application Data to proxy (10.91.239.121).
Packet 34: Proxy (10.91.239.121) sends Change Cipher Spec and 146 bytes to webserver (142.250.196.164).
Packet 35: Proxy (10.91.239.121) sends 112 bytes of Application Data to webserver (142.250.196.164).
Packet 36: Proxy (10.91.239.121) sends ACK to client (10.91.239.123).
Packet 37: Proxy (10.91.239.121) sends 115 bytes of Application Data to webserver (142.250.196.164).
Packet 38: Client (10.91.239.123) sends 207 bytes of Application Data to proxy (10.91.239.121).
Packet 39: Proxy (10.91.239.121) sends 101 bytes of Application Data to webserver (142.250.196.164).
Packet 40: Proxy (10.91.239.121) sends 128 bytes of Application Data to webserver (142.250.196.164).
Packet 41: WebServer (142.250.196.164) sends 714 bytes of Application Data to proxy (10.91.239.121).
Packet 42: WebServer (142.250.196.164) sends 97 bytes of Application Data to proxy (10.91.239.121).
Packet 43: Proxy (10.91.239.121) sends ACK to webserver (142.250.196.164).
Packet 44: Proxy (10.91.239.121) sends ACK to webserver (142.250.196.164).
Packet 45: Proxy (10.91.239.121) sends 767 bytes of Application Data to client (10.91.239.123).
Packet 46: WebServer (142.250.196.164) sends ACK to proxy (10.91.239.121).
Packet 47: Client (10.91.239.123) sends 119 bytes of Application Data to proxy (10.91.239.121).
Packet 48: Proxy (10.91.239.121) sends 97 bytes of Application Data to webserver (142.250.196.164).
Packet 49: WebServer (142.250.196.164) sends ACK to proxy (10.91.239.121).
Packet 50: Proxy (10.91.239.121) sends ACK to client (10.91.239.123).
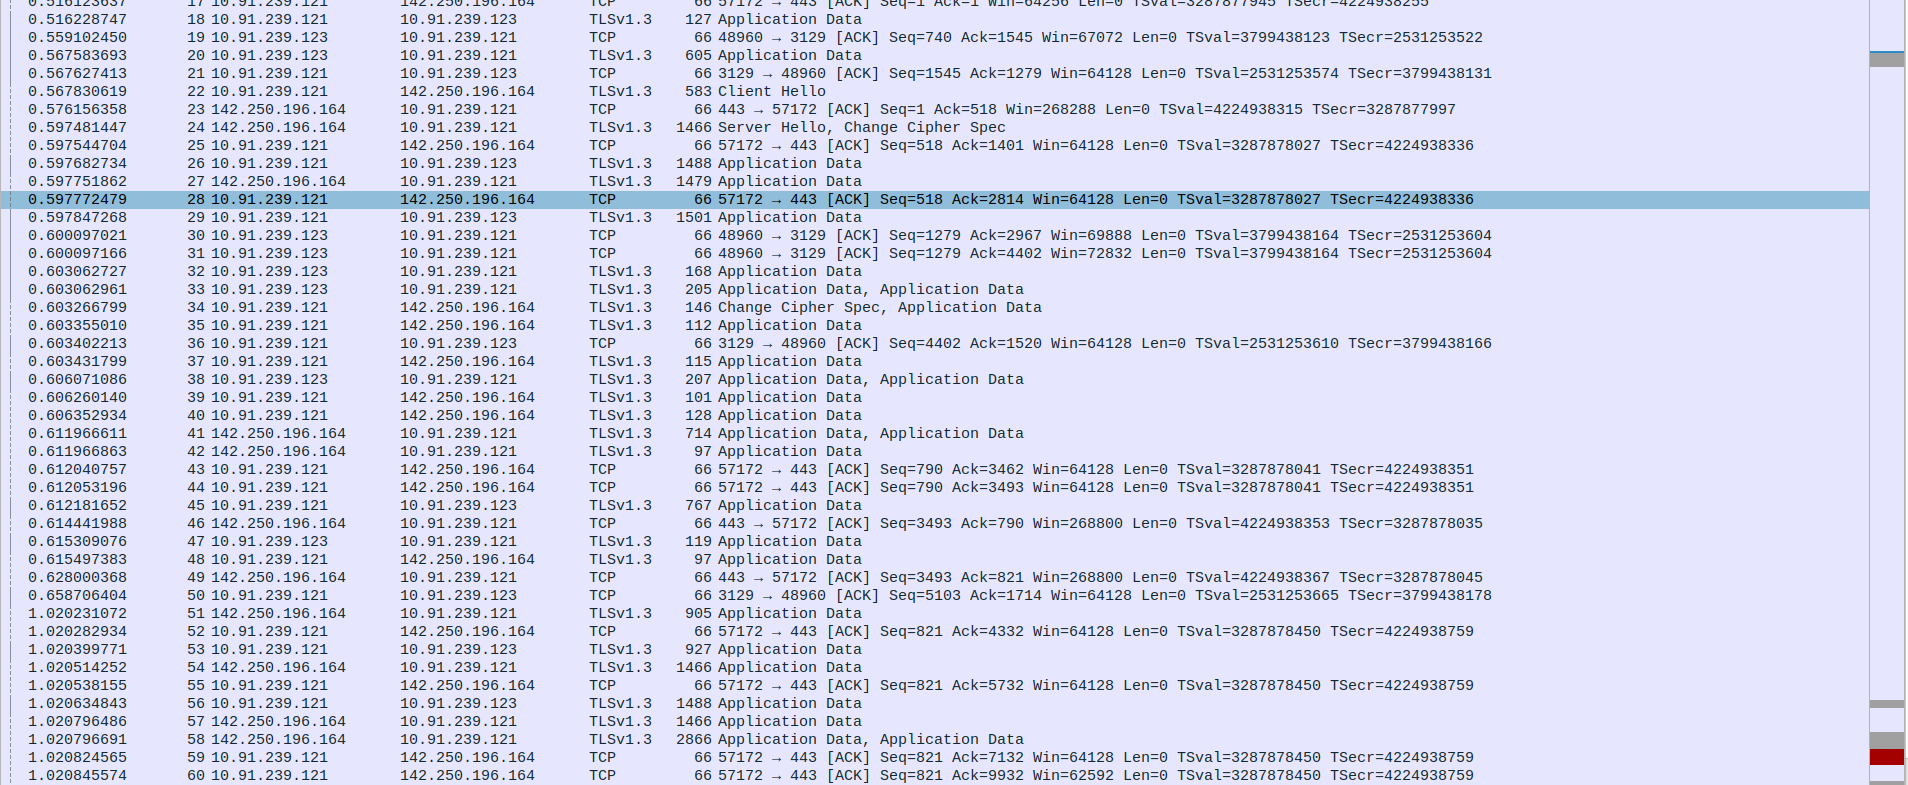
Packet 51: WebServer (142.250.196.164) sends 905 bytes of Application Data to proxy (10.91.239.121).
Packet 52: Proxy (10.91.239.121) sends ACK to Webserver (142.250.196.164).
Packet 53: Proxy (10.91.239.121) sends 927 bytes of Application Data to client (10.91.239.123).
Packet 54: WebServer (142.250.196.164) sends 1466 bytes of Application Data to proxy (10.91.239.121).
Packet 55: Proxy (10.91.239.121) sends ACK to webserver (142.250.196.164).
Packet 56: Proxy (10.91.239.121) sends 1488 bytes of Application Data to client (10.91.239.123).
Packet 57: WebServer (142.250.196.164) sends 1466 bytes of Application Data to proxy (10.91.239.121).
Packet 58: WebServer (142.250.196.164) sends 2866 bytes of Application Data to proxy (10.91.239.121).
Packet 59: Proxy (10.91.239.121) sends ACK to webserver (142.250.196.164).
Packet 60: Proxy (10.91.239.121) sends ACK to webserver (142.250.196.164).
Packet 61: Proxy (10.91.239.121) sends 4288 bytes of Application Data to client (10.91.239.123) using TLSv1.3.
Packet 62: WebServer (142.250.196.164) sends 2866 bytes of Application Data to proxy (10.91.239.121) using TLSv1.3.
Packet 63: Proxy (10.91.239.121) sends ACK (Sequence=821, Acknowledgment=12732) to webserver (142.250.196.164) on TCP port 443.
Packet 64: Proxy (10.91.239.121) sends 2888 bytes of Application Data to client (10.91.239.123) using TLSv1.3.
Packet 65: WebServer (142.250.196.164) sends 2866 bytes of Application Data to proxy (10.91.239.121) using TLSv1.3.
Packet 66: Proxy (10.91.239.121) sends ACK (Sequence=821, Acknowledgment=15532) to webserver (142.250.196.164) on TCP port 443.
Packet 67: Proxy (10.91.239.121) sends 2888 bytes of Application Data to client (10.91.239.123) using TLSv1.3.
Packet 68: WebServer (142.250.196.164) sends 1466 bytes of Application Data to proxy (10.91.239.121) using TLSv1.3.
Packet 69: Proxy (10.91.239.121) sends ACK (Sequence=821, Acknowledgment=16932) to webserver (142.250.196.164) on TCP port 443.
Packet 70: Proxy (10.91.239.121) sends 1488 bytes of Application Data to client (10.91.239.123) using TLSv1.3.
Packet 71: webServer (142.250.196.164) sends 1880 bytes of Application Data to proxy (10.91.239.121) using TLSv1.3.
Packet 72: Proxy (10.91.239.121) sends ACK (Sequence=821, Acknowledgment=18746) to webserver (142.250.196.164) on TCP port 443.
Packet 73: WebServer (142.250.196.164) sends 1466 bytes of Application Data to proxy (10.91.239.121) using TLSv1.3.
Packet 74: Proxy (10.91.239.121) sends ACK (Sequence=821, Acknowledgment=20146) to webserver (142.250.196.164) on TCP port 443.
Packet 75: WebServer (142.250.196.164) sends 1466 bytes of Application Data to proxy (10.91.239.121) using TLSv1.3.
Packet 76: wevServer (142.250.196.164) sends 1466 bytes of Application Data to proxy (10.91.239.121) using TLSv1.3.
Packet 77: Proxy (10.91.239.121) sends ACK (Sequence=821, Acknowledgment=21546) to webserver (142.250.196.164) on TCP port 443.
Packet 78: Proxy (10.91.239.121) sends ACK (Sequence=821, Acknowledgment=22946) to webserver (142.250.196.164) on TCP port 443.
Packet 79: WebServer (142.250.196.164) sends 1357 bytes of Application Data to proxy (10.91.239.121) using TLSv1.3.
Packet 80: WebServer (142.250.196.164) sends 105 bytes of Application Data to proxy (10.91.239.121) using TLSv1.3.
Packet 81: Proxy (10.91.239.121) sends ACK (Sequence=821, Acknowledgment=24237) to webserver (142.250.196.164) on TCP port 443.
Packet 82: Proxy (10.91.239.121) sends ACK (Sequence=821, Acknowledgment=24276) to webserver (142.250.196.164) on TCP port 443.
Packet 83: Proxy (10.91.239.121) sends 1448 bytes of Application Data to client (10.91.239.123) in TCP segment of a reassembled PDU.
Packet 84: Client (10.91.239.123) sends ACK (Sequence=1714, Acknowledgment=7386) to proxy (10.91.239.121) on TCP port 48960.
Packet 85: Client (10.91.239.123) sends ACK (Sequence=1714, Acknowledgment=17252) to proxy (10.91.239.121) on TCP port 48960.
Packet 86: Client (10.91.239.123) sends ACK (Sequence=1714, Acknowledgment=20122) to proxy (10.91.239.121) on TCP port 48960.
Packet 87: Proxy (10.91.239.121) sends 2962 bytes of Application Data to client (10.91.239.123) using TLSv1.3.
Packet 88: Proxy (10.91.239.121) sends 2962 bytes of Application Data to client (10.91.239.123) using TLSv1.3.
Packet 89: Proxy (10.91.239.121) sends 258 bytes of Application Data to client (10.91.239.123) using TLSv1.3.
Packet 90: Client (10.91.239.123) sends ACK (Sequence=1714, Acknowledgment=26106) to proxy (10.91.239.121) on TCP port 48960.
Packet 91: Client (10.91.239.123) sends 127 bytes of Application Data to proxy (10.91.239.121) using TLSv1.3.
Packet 92: Proxy (10.91.239.121) sends ACK (Sequence=26106, Acknowledgment=1775) to client (10.91.239.123) on TCP port 3129.
Packet 93: Proxy (10.91.239.121) sends 105 bytes of Application Data to webserver (142.250.196.164) using TLSv1.3.
Packet 94: Client (10.91.239.123) sends 136 bytes of Application Data to proxy (10.91.239.121) using TLSv1.3.
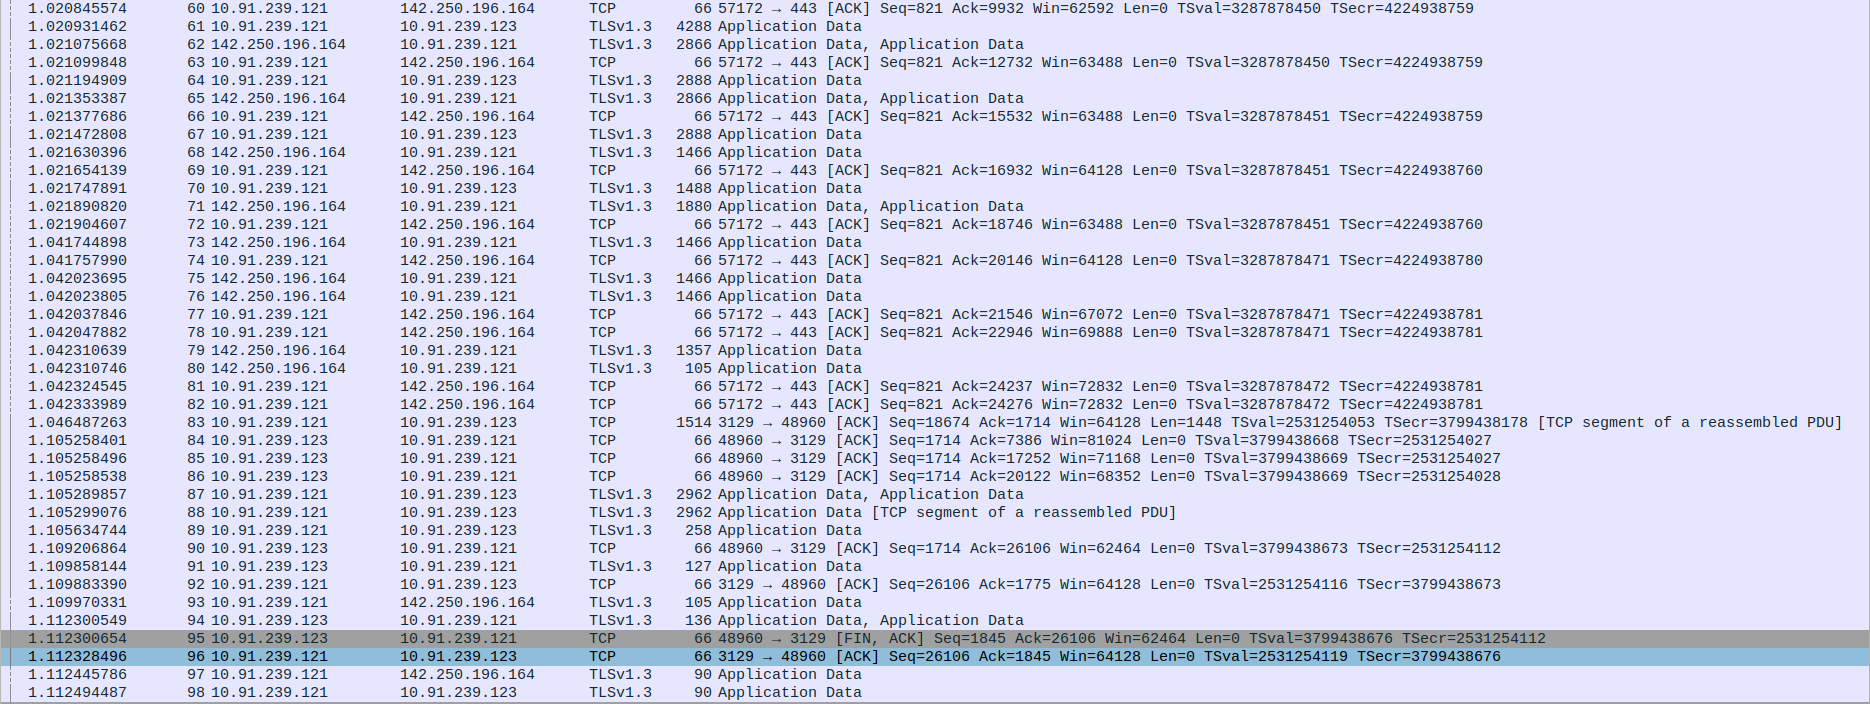
- 4.TCP Connection Termination Between client,proxy and webserver
Packet 95: Client(10.91.239.123) sends FIN, ACK to Proxy(10.91.239.121) to initiate connection termination.
Packet 96: Proxy(10.91.239.121) sends ACK back to Client(10.91.239.123) :1confirming the FIN.
Packet 97: Proxy(10.91.239.121) sends final Application Data (TLSv1.3) to the webServer(142.250.196.164).
Packet 98: Proxy(10.91.239.121) sends Application Data (TLSv1.3) to Client(10.91.239.123) after acknowledging FIN.
Packet 99: Proxy(10.91.239.121) sends FIN, ACK to Client(10.91.239.123) indicating it is done sending data.
Packet 100: Proxy(10.91.239.121) sends FIN, ACK to the webServer(142.250.196.164) to close the connection.
Packets 101 & 102: Client sends RST twice to forcefully close the connection (possibly due to data after FIN or abrupt end).
Packet 103 & 104: WebServer(142.250.196.164) responds with ACK to Proxy’s(10.91.239.121) FIN.
Packet 105: WebServer(142.250.196.164) sends its own FIN, ACK to Proxy(10.91.239.121).
Packet 106: (Repetition of FIN-ACK acknowledgment, might be due to retransmission or confirmation)
Packet 107: Proxy(10.91.239.121) sends final ACK to WebServer(142.250.196.164), completing the TCP connection closure.

Step-1: Install Apache Web Server
test:~$ sudo apt update
test:~$ sudo apt install apache2 -y
Step-2: Adjust the Firewall
1.Check available apache UFW profiles:
test:~$ sudo ufw app list
Available applications:
Apache
Apache Full
Apache Secure
2.You want to allow both http and https,so Apache Full is a good choice.
test:~$ sudo ufw allow 'Apache Full'Step-3: Verify apache service
test:~$ sudo systemctl start apache2
test:~$ sudo systemctl enable apache2
test:~$ sudo systemctl status apache2
Step-4: Test your Webserver
Open your webserver and navigate to your server’s IP address like http://10.91.239.125
To check in terminal also
test:~$ curl -v http://10.91.239.125
You should see the default apache ubuntu page.This confirms that apache is installed and running correctly.
Note
10.91.239.125 is the your’s server IP address of Ubuntu Machine.
Step-5: Lets create your own domain.com
Create a directory for your domain:
test:~$ sudo mkdir -p /var/www/myuniqueproxy.com/htmlNote
myuniqueproxy.com is my own domain.com.You can replace with this your’s actual domain.com.
Create a sample index.html file
test:~$ sudo nano /var/www/myuniqueproxy.com/html/index.html
<!DOCTYPE html>
<html>
<head>
<title>Welcome to myuniqueproxy.com domain</title>
</head>
<body>
<h1>Hello from my own web server!</h1>
<p>This page is hosted on Apache running on Ubuntu.</p>
</body>
</html>
Save the file (Ctrl+O, Enter, Ctrl+X).
Note
You want to add some more context.You can add in index.html file.
Step-6: Set Proper permissions
test:~$ sudo chown -R www-data:www-data /var/www/myuniqueproxy.com/html
test:~$ sudo chmod -R 755 /var/www/myuniqueproxy.com
Step-7: Enable SSL module and default SSL site
test:~$ sudo a2enmod ssl
test:~$ sudo a2ensite default-ssl
test:~$ sudo systemctl reload apache2
Step-8: Generate a Self-Signed SSL Certificate
1.Create a directory to store your certificate
test:~$ sudo mkdir -p /etc/apache2/ssl
2.Now generate the certificate and private key
test:~$ sudo openssl req -x509 -nodes -days 365 -newkey rsa:2048 -keyout /etc/apache2/ssl/apache-selfsigned.key -out /etc/apache2/ssl/apache-selfsigned.crt
Note
You will be prompted to enter values like country, state, etc.Common name section you enter your server IP address.These will appear in your certificate.
Step-9: Configure Apache to Use Your Certificate
Edit the default SSL site:
test:~$ sudo nano /etc/apache2/sites-available/default-ssl.conf
<IfModule mod_ssl.c>
<VirtualHost _default_:443>
ServerAdmin webmaster@localhost

DocumentRoot /var/www/myuniqueproxy.com/html

# ServerName is optional for IP-based access
# ServerName your-domain.com

ErrorLog ${APACHE_LOG_DIR}/error.log
CustomLog ${APACHE_LOG_DIR}/access.log combined

# SSL Configuration
SSLEngine on

SSLProtocol -all +TLSV1.2
SSLCipherSuite RSA+AESGCM

SSLCertificateFile      /etc/apache2/ssl/apache-selfsigned.crt
SSLCertificateKeyFile   /etc/apache2/ssl/apache-selfsigned.key

<FilesMatch "\.(cgi|shtml|phtml|php)$">
SSLOptions +StdEnvVars
</FilesMatch>
<Directory /usr/lib/cgi-bin>
SSLOptions +StdEnvVars
</Directory>

# Optional security headers
Header always set X-Frame-Options DENY
Header always set X-Content-Type-Options nosniff
Header always set X-XSS-Protection "1; mode=block"

# Optional SSL settings (hardened)
SSLProtocol all -SSLv3 -TLSv1 -TLSv1.1
SSLCipherSuite HIGH:!aNULL:!MD5
SSLHonorCipherOrder on
</VirtualHost>
</IfModule>
Save and exit (Ctrl+O, Enter, then Ctrl+X).
Note
SSLProtocol -all +TLSV1.2 ,SSLCipherSuite RSA+AESGCM these two lines are support for TLSV1.2 protocol.
If you comment these two lines then it support for TLSV1.3 protocol.
Step-10: Restart Apache
test:~$ sudo systemctl restart apache2
Step-11: Test Your Server
Open a browser and go to:
Note
You’ll see a warning that the certificate is not trusted — this is expected with a self-signed certificate. You can proceed anyway.
After you observe the your index.html page.
10.91.239.125 is the server IP address
Step -1 : obtain the custom webserver’s certificate
test:~$ echo | openssl s_client -showcerts -connect 10.91.239.125:443
This will show you the certificate chain the custom webserver is presenting.copy the certificate from the output (the blocking starting with —-begin certificate—-and ending with —END CERTIFICATE—).
save it to a file,e.g., ownwebserver.crt
step-2 : ADD the custom webserver certificate to trusted CA store
1.copy the custom webserver certificate to /usr/local/share/ca-certificates/
test:~$ sudo cp ownwebserver.crt /usr/local/share/ca-certificates/
2.update the certificate store
test:~$ sudo update-ca-certificates
this will add the custom webserver’s self-signed certificate to the list of trusted certificates.
Note
10.91.239.125 is the IP address of the proxyserver(squid) and webserver.
Both proxyserver and webserver are running on same machine.
- 1.Set SSLKEYLOGFILE Environment Variable on client side
Set this environment variable to capture the session keys.
test:~$ export SSLKEYLOGFILE=~/https_sslkeys.log
Note
This tells supported TLS libraries to log pre-master secrets into that file.
This only works if the TLS library used by curl supports it (like OpenSSL with debug support or NSS).
- 2.RUN the curl command on client side
test:~$ curl --proxy https://10.91.239.125:3129 --proxy-cacert /path/to/proxy_cert.pem https://10.91.239.125
- 3.Start a Wireshark capture both sides(client and server side)
Open Wireshark.
Select the network interface that your traffic goes through (e.g., eth0, wlan0).
Apply a capture filter if you want, or just start the capture.
Run your curl command while capturing is active.
test:~$ curl --proxy https://10.91.239.125:3129 --proxy-cacert /path/to/proxy_cert.pem https://10.91.239.125
- 4.Configure Wireshark to use the SSL key log both sides
Go to Edit > Preferences > Protocols > TLS.
Find the field for:
(Pre)-Master-Secret log filename
Set it to the path of your sslkeys.log file, e.g.,/home/user/https_sslkeys.log
Click OK.
Then,Wireshark will use the session keys to decrypt HTTPS traffic.
- 5.View decrypted traffic
You should now see decrypted HTTP requests and responses in plain text on client and server sides!
In this case you observe the decryption squid to webserver and webserver to squid.
Step-1: Setup HTTPS proxy server using ssl-bump on ubuntu
1.Check Squid version and SSL support
test:~$ squid -v
Squid Cache: Version 4.10
Service Name: squid
Compile-time options:
...
--with-openssl
--enable-ssl
--enable-ssl-crtd
...
Note
If you see these, your Squid supports SSL Bump and OpenSSL.
If you do NOT see SSL/OpenSSL flags,you need to install a Squid version compiled with OpenSSL.
Install squid version with openssl
test:~$ sudo apt install squid-openssl
2.Edit squid.conf file
test:~$ sudo nano /etc/squid/squid.conf
# Squid listens on port 3129 with SSL bump enabled
http_port 3129 ssl-bump cert=/etc/squid/ssl_cert/squid.crt key=/etc/squid/ssl_cert/squid.key generate-host-certificates=on dynamic_cert_mem_cache_size=4MB

# SSL cert helper program
sslcrtd_program /usr/lib/squid/ssl_crtd -s /var/lib/ssl_db -M 4MB
sslcrtd_children 5

# ACL for your client IP
acl client_ip src 192.168.0.10

# Define safe ports
acl safe_ports port 80
acl safe_ports port 443
acl safe_ports port 1025-65535

# SSL bump steps
acl step1 at_step SslBump1

# SSL bump rules
ssl_bump peek step1
ssl_bump bump all

# Access rules
http_access allow client_ip
http_access deny all

# Allow only safe ports
http_access allow safe_ports

# Logging and cache
access_log /var/log/squid/access.log
cache_dir ufs /var/spool/squid 100 16 256
visible_hostname sysadmin

# Persistent connection handling
client_persistent_connections off
server_persistent_connections off
3.Initialize SSL DB
test:~$ sudo /usr/lib/squid/ssl_crtd -c -s /var/lib/ssl_db
test:~$ sudo chown -R proxy:proxy /var/lib/ssl_db
4.Start the Squid server
test:~$ sudo systemctl restart squid
test:~$ sudo systemctl enable  squid
test:~$ sudo systemctl status squid
Step-2 : Decrypting HTTPS traffic in wireshark
Note
10.91.239.125 is the IP address of proxyserver(squid) and webserver.
Both proxyserver and webserver run on the same machine.
1.Set SSLKEYLOGFILE Environment Variable on client side
Set this environment variable to capture the session keys.
test:~$ export SSLKEYLOGFILE=~/https_ssl_bump_sslkeys.log
Note
This tells supported TLS libraries to log pre-master secrets into that file.
This only works if the TLS library used by curl supports it (like OpenSSL with debug support or NSS).
- 2.RUN the curl command on client side
test:~$ curl --proxy http://10.91.239.125:3129 --proxy-cacert /path/to/proxy_cert.pem https://10.91.239.125
- 3.Start a Wireshark capture both sides(client and server side)
Open Wireshark.
Select the network interface that your traffic goes through (e.g., eth0, wlan0).
Apply a capture filter if you want, or just start the capture.
Run your curl command while capturing is active.
test:~$ curl --proxy http://10.91.239.125:3129 --proxy-cacert /path/to/proxy_cert.pem https://10.91.239.125
- 4.Configure Wireshark to use the SSL key log both sides
Go to Edit > Preferences > Protocols > TLS.
Find the field for:
(Pre)-Master-Secret log filename
Set it to the path of your sslkeys.log file, e.g.,/home/user/https_ssl_bump_sslkeys.log
Click OK.
Then,Wireshark will use the session keys to decrypt HTTPS traffic.
- 5.View decrypted traffic
You should now see decrypted HTTP requests and responses in plain text on client and server sides!
In this case you observe the decryption client to proxyserver(squid) and proxyserver(squid) to client.
FILE NAME |
PATH |
DESCRIPTION |
squid.crt |
/etc/squid/ssl_cert/squid.crt |
Public certificate (contains public key) used by Squid to present to clients during HTTPS interception (SSL-Bump). |
squid.key |
/etc/squid/ssl_cert/squid.key |
Private key that matches squid.crt. Used by Squid to decrypt HTTPS traffic. |
sslkeylogfile |
/home/user/https_sslkeys.log |
Log file that contains TLS session keys (pre-master secrets). Used by Wireshark to decrypt HTTPS traffic. |
proxy_cert.pem |
/etc/squid/ssl_cert/proxy_cert.pem |
Public certificate (or CA cert) used by the client (e.g., curl) to verify the Squid proxy when connecting over HTTPS. Often same as squid.crt if self-signed. |
apache-selfsigned.crt |
/etc/apache2/ssl/apache-selfsigned.crt |
Self-signed public certificate used for local or test HTTPS setups. |
apache-selfsigned.key |
/etc/apache2/ssl/apache-selfsigned.key |
Private key matching apache-selfsigned.crt. Needed for SSL/TLS on the server. |
ownwebserver.crt |
/home/user/ownwebserver.crt |
Public certificate for your web server. Presented to clients during HTTPS connections. |
FAQs
Reference links